Creating a Basic Driving Robot#
Lets get moving!
Overview#
This section is designed to help you program a basic driving robot, start to finish.
See table of contents for a breakdown of this section.
Creating the Drivetrain Subsystem#
Before we begin we must create the class file for the drivetrain subsystem. See Creating a New Subsystem for info on how to do this.
What will be added to the Drivetrain#
In the Drivetrain class we will tell the subsystem what type of components it will be using.
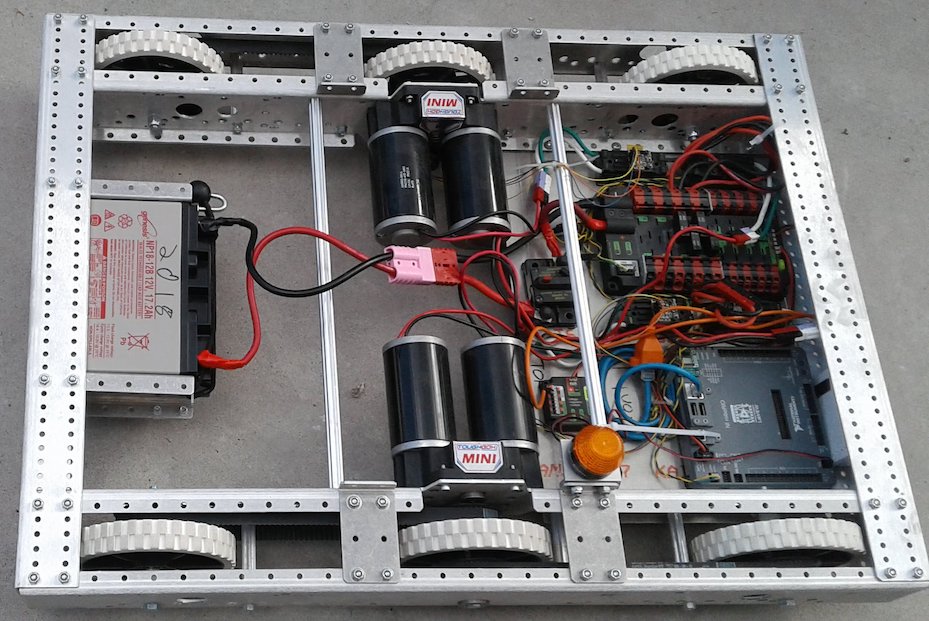
- A Drivetrain needs motor controllers. In our case we will use 4 Talon SRs (a brand of controller for motors).
- You could use other motor controllers such as Victor SPs or Talon SRXs but we will be using Talon SRs
- If you are using other motor controllers, replace Talon with TalonSRX, Victor, or VictorSP in the code you write depending on the type you use.
- You can use 2 motors (left and right), but for this tutorial we will use 4.
Tip
Be sure to read [Visual Studio Code Tips](../basics/vscode_tips.md){target=_blank} before getting started! It will make your life a lot easier.Creating the Talon Variables#
1) Create 4 global variables of data type Talon and name them: leftFrontTalon, rightFrontTalon, leftBackTalon, rightBackTalon
- To get started type the word Talon followed by the name i.e.
Talon leftFrontTalon; - These will eventually hold the object values for Talons and their port numbers.
2) Next assign their values to null (more info on null).
- We do this to make sure it is empty at this point.
- When we assign these variables a value, we will be getting the motor controller's port numbers out of Constants
- This means we cannot assign them at the global level
Example
The code you typed should be this:
Talon leftFrontTalon = null;
Talon leftBackTalon = null;
Talon rightFrontTalon = null;
Talon rightBackTalon = null;
Your full Drivetrain.java should look like this:
package frc.robot.subsystems;

import edu.wpi.first.wpilibj.Talon;
import edu.wpi.first.wpilibj.command.Subsystem;

/**
 * Add your docs here.
 */
public class Drivetrain extends Subsystem {
  // Put methods for controlling this subsystem
  // here. Call these from Commands.

  Talon leftFrontTalon = null;
  Talon leftBackTalon = null;
  Talon rightFrontTalon = null;
  Talon rightBackTalon = null;

  @Override
  public void periodic() {
    // This method will be called once per scheduler run
  }
}
If an error occurs (red squiggles)
- Click the word Talon

- 💡 Click the light bulb
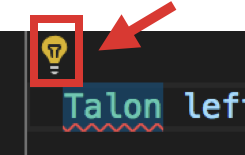
- Select "Import 'Talon' (edu.wpi.first.wpilibj)"
- Your error should be gone!
Creating and filling the constructor#
1) Create the constructor for Drivetrain.java (more info on constructors)
- The constructor is where we will assign values to our talon variables.
Now that we have created the Talons we must initialize them and tell them what port on the roboRIO they are on.
2) Initialize (set value of) leftFrontTalon to new Talon(0).
- This initializes a new talon,
leftFrontTalon, in a new piece of memory and states it is on port 0 of the roboRIO. - This should be done within the constructor
Drivetrain() -
- The constructor
Talon(int)takes a variable of typeint. In this case theint(integer) refers to the port number on the roboRIO.
This calls the constructor
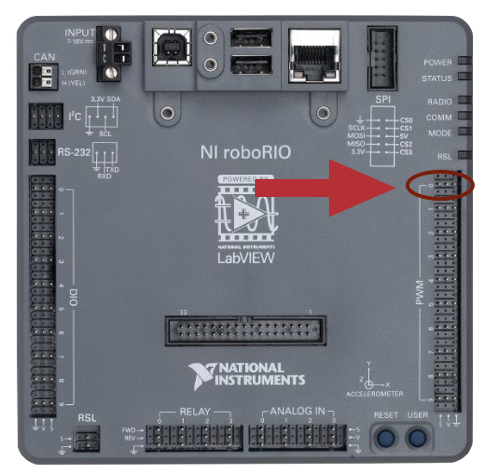
Talon(int)in the Talon class.roboRIO port diagram
- The constructor
Example
The code you typed should be this:
public Drivetrain() {
  // Talons
  leftFrontTalon = new Talon(0);
}
Your full Drivetrain.java should look like this:
package frc.robot.subsystems;

import edu.wpi.first.wpilibj.Talon;
import edu.wpi.first.wpilibj.command.Subsystem;

/**
 * Add your docs here.
 */
public class Drivetrain extends Subsystem {
  // Put methods for controlling this subsystem
  // here. Call these from Commands.

  Talon leftFrontTalon = null;
  Talon leftBackTalon = null;
  Talon rightFrontTalon = null;
  Talon rightBackTalon = null;

  public Drivetrain() {
    // Talons
    leftFrontTalon = new Talon(0);
  }

  @Override
  public void periodic() {
    // This method will be called once per scheduler run
  }
Using Constants#
Since each subsystem has its own components with their own ports, it is easy to lose track of which ports are being used and for what. To counter this you can use a class called Constants to hold all these values in a single location.
1) To use Constants, instead of putting 0 for the port on the Talon type:
Constants.DRIVETRAIN_LEFT_FRONT_TALON- Names should follow the pattern SUBSYSTEM_NAME_OF_COMPONENT
- The name is all caps since it is a constant (more info on constants).
2) Click on the underlined text 
3) Click on the 💡light bulb and select “create constant…” 
4) Click on Constants.java tab that just popped up 
5) Change the 0 to the correct port for that motor controller on your robot/roboRIO 
Danger
If you set this to the wrong value, you could damage your robot when it tries to move!
6) Repeat these steps for the remaining Talons.
Tip
Remember to save both Drivetrain.java and Constants.java
Example
The code you type should be this:
leftFrontTalon = new Talon(Constants.DRIVETRAIN_LEFT_FRONT_TALON);Your full Drivetrain.java should look like this:
package frc.robot.subsystems;

import edu.wpi.first.wpilibj.Talon;
import edu.wpi.first.wpilibj.command.Subsystem;
import frc.robot.Constants;

/**
 * Add your docs here.
 */
public class Drivetrain extends Subsystem {
  // Put methods for controlling this subsystem
  // here. Call these from Commands.

  Talon leftFrontTalon = null;
  Talon leftBackTalon = null;
  Talon rightFrontTalon = null;
  Talon rightBackTalon = null;

  public Drivetrain() {
    // Talons
    leftFrontTalon = new Talon(Constants.DRIVETRAIN_LEFT_FRONT_TALON);
    leftBackTalon = new Talon(Constants.DRIVETRAIN_LEFT_BACK_TALON);
    rightFrontTalon = new Talon(Constants.DRIVETRAIN_RIGHT_FRONT_TALON);
    rightBackTalon = new Talon(Constants.DRIVETRAIN_RIGHT_BACK_TALON);
  }

  @Override
  public void periodic() {
    // This method will be called once per scheduler run
  }
}
Your full Constants.java should look similar to this:
package frc.robot;

public class Constants {
  // Talons
  public static final int DRIVETRAIN_LEFT_FRONT_TALON = 0;
  public static final int DRIVETRAIN_LEFT_BACK_TALON = 1;
  public static final int DRIVETRAIN_RIGHT_FRONT_TALON = 2;
  public static final int DRIVETRAIN_RIGHT_BACK_TALON = 3;
}
Warning
Remember to use the values for YOUR specific robot or you could risk damaging it!
Creating the arcade drive#
What is the Drive Class#
- The FIRST Drive class has many pre-configured methods available to us including DifferentialDrive, and many alterations of MecanumDrive.
- DifferentialDrive contains subsections such as TankDrive and ArcadeDrive.
- For our tutorial we will be creating an ArcadeDrive
- Arcade drives run by taking a moveSpeed and rotateSpeed. moveSpeed defines the forward and reverse speed and rotateSpeed defines the turning left and right speed.
- To create an arcade drive we will be using our already existing Drivetrain class and adding to it.
Programing a RobotDrive#
1) In the same place we created our talons (outside of the constructor) we will create a DifferentialDrive and SpeedControllerGroups for our left and right motor controllers.
Outside of the constructor type:
SpeedControllerGroup leftMotors = null;
SpeedControllerGroup rightMotors = null;

DifferentialDrive differentialDrive = null;- Since DifferentialDrive only takes 2 parameters we need to create speed controller groups to combine like motor controllers together.
- In this case we will combine the left motors together and the right motors together.
Warning
You should only group motors that are spinning the same direction physically when positive power is being applied otherwise you could damage your robot.
2) Now we must initialize the SpeedControllerGroups and DifferentialDrive like we did our talons. ...
In the constructor type:
leftMotors = new SpeedControllerGroup(leftFrontTalon, leftBackTalon);
rightMotors = new SpeedControllerGroup(rightFrontTalon, rightBackTalon);

differentialDrive = new DifferentialDrive(leftMotors, rightMotors);
Example
The code you type outside the constructor should be this:
SpeedControllerGroup leftMotors = null;
SpeedControllerGroup rightMotors = null;

DifferentialDrive differentialDrive = null;
The code you type inside the constructor should be this:
leftMotors = new SpeedControllerGroup(leftFrontTalon, leftBackTalon);
rightMotors = new SpeedControllerGroup(rightFrontTalon, rightBackTalon);

differentialDrive = new DifferentialDrive(leftMotors, rightMotors);
Your full Drivetrain.java should look like this:
package frc.robot.subsystems;

import edu.wpi.first.wpilibj.SpeedControllerGroup;
import edu.wpi.first.wpilibj.Talon;
import edu.wpi.first.wpilibj.command.Subsystem;
import edu.wpi.first.wpilibj.drive.DifferentialDrive;
import frc.robot.Constants;

/**
 * Add your docs here.
 */
public class Drivetrain extends Subsystem {
  // Put methods for controlling this subsystem
  // here. Call these from Commands.

  Talon leftFrontTalon = null;
  Talon leftBackTalon = null;
  Talon rightFrontTalon = null;
  Talon rightBackTalon = null;

  SpeedControllerGroup leftMotors = null;
  SpeedControllerGroup rightMotors = null;

  DifferentialDrive differentialDrive = null;

  public Drivetrain() {
    // Talons
    leftFrontTalon = new Talon(Constants.DRIVETRAIN_LEFT_FRONT_TALON);
    leftBackTalon = new Talon(Constants.DRIVETRAIN_LEFT_BACK_TALON);
    rightFrontTalon = new Talon(Constants.DRIVETRAIN_RIGHT_FRONT_TALON);
    rightBackTalon = new Talon(Constants.DRIVETRAIN_RIGHT_BACK_TALON);

    leftMotors = new SpeedControllerGroup(leftFrontTalon, leftBackTalon);
    rightMotors = new SpeedControllerGroup(rightFrontTalon, rightBackTalon);

    differentialDrive = new DifferentialDrive(leftMotors, rightMotors);
  }

  @Override
  public void periodic() {
    // This method will be called once per scheduler run
  }
}
Creating the arcadeDrive method#
Now it’s time to make an arcadeDrive from our differentialDrive!
1) Let’s create a public void method called “arcadeDrive” with type “double” parameters moveSpeed and rotateSpeed.
Below the constructor type:
public void arcadeDrive(double moveSpeed, double rotateSpeed) {

}
Tip
By putting something in the parentheses it makes the method require a parameter when it is used. When the method gets used and parameters are passed, they will be store in moveSpeed and rotateSpeed (in that order). See parameters for more info.
2) Now lets make our method call the differentialDrive's arcadeDrive method.
Inside our method type:
differentialDrive.arcadeDrive(moveSpeed, rotateSpeed);DifferentialDrive's arcadeDrive method takes parameters moveValue and rotateValue.
Note
At this point you could instead create a tank drive, however implementation differs slightly. To do so type differentialDrive.tankDrive(moveSpeed, rotateSpeed); instead of differentialDrive.arcadeDrive(moveSpeed, rotateSpeed); and change the method name reflect this.
Tip
If you want to limit the max speed you can multiple the speeds by a decimal (i.e. 0.5*moveSpeed will make the motors only move half of their maximum speed)
You may want to do this for initial testing to make sure everything is going the right direction.
Example
The code you type should be this:
public void arcadeDrive(double moveSpeed, double rotateSpeed) {
  differentialDrive.arcadeDrive(moveSpeed, rotateSpeed);
}
Your full Drivetrain.java should look like this:
package frc.robot.subsystems;

import edu.wpi.first.wpilibj.SpeedControllerGroup;
import edu.wpi.first.wpilibj.Talon;
import edu.wpi.first.wpilibj.command.Subsystem;
import edu.wpi.first.wpilibj.drive.DifferentialDrive;
import frc.robot.Constants;

/**
 * Add your docs here.
 */
public class Drivetrain extends Subsystem {
  // Put methods for controlling this subsystem
  // here. Call these from Commands.

  Talon leftFrontTalon = null;
  Talon leftBackTalon = null;
  Talon rightFrontTalon = null;
  Talon rightBackTalon = null;

  SpeedControllerGroup leftMotors = null;
  SpeedControllerGroup rightMotors = null;

  DifferentialDrive differentialDrive = null;

  public Drivetrain() {
    // Talons
    leftFrontTalon = new Talon(Constants.DRIVETRAIN_LEFT_FRONT_TALON);
    leftBackTalon = new Talon(Constants.DRIVETRAIN_LEFT_BACK_TALON);
    rightFrontTalon = new Talon(Constants.DRIVETRAIN_RIGHT_FRONT_TALON);
    rightBackTalon = new Talon(Constants.DRIVETRAIN_RIGHT_BACK_TALON);

    leftMotors = new SpeedControllerGroup(leftFrontTalon, leftBackTalon);
    rightMotors = new SpeedControllerGroup(rightFrontTalon, rightBackTalon);

    differentialDrive = new DifferentialDrive(leftMotors, rightMotors);
  }

  public void arcadeDrive(double moveSpeed, double rotateSpeed) {
    differentialDrive.arcadeDrive(moveSpeed, rotateSpeed);
  }

  @Override
  public void periodic() {
    // This method will be called once per scheduler run
  }
}
Making our robot controllable#
Creating the Joystick#
In order to drive our robot, it needs to know what will be controlling it. To do so, we will create a new joystick in RobotContainer.java
1) Open RobotContainer.java
2) Type:
public Joystick driverController = new Joystick(Constants.DRIVER_CONTROLLER);- Import any classes if necessary such as:
import edu.wpi.first.wpilibj.Joystick; - A variable
driverControllerof type Joystick pointing to a joystick on portDRIVER_CONTROLLERfrom Constants
3) Click the 💡 light bulb to create a new CONSTANT and set the value to the port number the joystick uses on the laptop (this can be found in the Driverstation software).
Example
The code you type should be this:
public Joystick driverController = new Joystick(Constants.DRIVER_CONTROLLER);Your full RobotContainer.java should look like this:
package frc.robot;

import edu.wpi.first.wpilibj.Joystick;

/**
 * This class is where the bulk of the robot should be declared. Since
 * Command-based is a "declarative" paradigm, very little robot logic should
 * actually be handled in the {@link Robot} periodic methods (other than the
 * scheduler calls). Instead, the structure of the robot (including subsystems,
 * commands, and button mappings) should be declared here.
 */
public class RobotContainer {
  // The robot's subsystems and commands are defined here...
  public Joystick driverController = new Joystick(Constants.DRIVER_CONTROLLER);
}
Your full Constants.java should look similar to this:
package frc.robot;

public class Constants {
  // Talons
  public static final int DRIVETRAIN_LEFT_FRONT_TALON = 0;
  public static final int DRIVETRAIN_LEFT_BACK_TALON = 1;
  public static final int DRIVETRAIN_RIGHT_FRONT_TALON = 2;
  public static final int DRIVETRAIN_RIGHT_BACK_TALON = 3;

  // Joysticks
  public static final int DRIVER_CONTROLLER = 0;
}
Creating the DriveArcade Command#
- Remember that methods tell the robot what it can do but in order to make it do these things we must give it a command. See Command Based Robot
- Now that we have created the method, we need to create a command to call and use that method.
- Let’s create a new command called DriveArcade that calls arcadeDrive method we just created!
Before we begin we must create the class file for the DriveArcade command. See Creating a New Command for info on how to do this and info on what each pre-created method does.
In the constructor#
1) In the constructor DriveArcade() type:
addRequirements(RobotContainer.m_drivetrain);- This means, this command will end all other commands currently using drivetrain and will run instead when executed.
- It also means, other commands that require drivetrain will stop this command and run instead when executed.
Warning
If you use the light bulb to import ‘Robot', be sure to import the one with “frc.robot”
In the execute method#
1) In the execute method we will create 2 variables of type double called moveSpeed and rotateSpeed.
- We want these variables to be the value of the axis of the controller we are using to drive the robot. So we will set them equal to that by using the joystick getRawAxis method.
- Controllers return an axis value between 1 and -1 to indicate how far the joystick is pushed up or down. Our personal controller returns up as -1 so we want to invert it.
- In Java you can put a negative “ - “in front of a numeric value to invert it (value * -1)
- The joystick’s getRawAxis method will get the position value of the axis as you move it. The method takes parameter “axis number.” (This can be found in the Driverstation software and we will store it in Constants).
In the execute() method type:
double moveSpeed = -RobotContainer.driverController.getRawAxis(Constants.DRIVER_CONTROLLER_MOVE_AXIS);
double rotateSpeed = RobotContainer.driverController.getRawAxis(Constants.DRIVER_CONTROLLER_ROTATE_AXIS);
Tip
Remember to use the light bulb for importing and creating constants if needed!
2) Also in the execute method we will we want to call the arcadeDrive method we created in Drivetrain and give it the variables moveSpeed and rotateSpeed we created as parameters.
In the execute() method below rotateSpeed type:
RobotContainer.m_drivetrain.arcadeDrive(moveSpeed, rotateSpeed);In the isFinished method#
Since we will be using this command to control the robot we want it to run indefinitely.
1) To do this we are going to continue having isFinished return false, meaning the command will never finish.
(We don't need to change anything as this is the default)
Tip
- If we did want a command to finish, we make this return true.
- This can be done by replacing false with true to make it finish instantly
- Alternatively we can make a condition which can return true
- For example
(timePassed > 10)will return true after 10 seconds but return false anytime before 10 seconds have passed.
- For example
In the end method#
1) We will call the arcadeDrive method and give it 0 and 0 as the parameters.
In the end() method type:
RobotContainer.m_drivetrain.arcadeDrive(0, 0);- This make the motors stop running when the command ends by setting the movement speed to zero and rotation speed to zero.
Completed Example#
Example
Your full Constants.java should look similar to this:
package frc.robot;

public class Constants {
  // Talons
  public static final int DRIVETRAIN_LEFT_FRONT_TALON = 0;
  public static final int DRIVETRAIN_LEFT_BACK_TALON = 1;
  public static final int DRIVETRAIN_RIGHT_FRONT_TALON = 2;
  public static final int DRIVETRAIN_RIGHT_BACK_TALON = 3;

  // Joysticks
  public static final int DRIVER_CONTROLLER = 0;
  public static final int DRIVER_CONTROLLER_MOVE_AXIS = 1; // Change for your controller
  public static final int DRIVER_CONTROLLER_ROTATE_AXIS = 2; // Change for your controller
}
Your full DriveArcade.java should look like this:
package frc.robot.commands;

import edu.wpi.first.wpilibj.command.Command;
import frc.robot.RobotContainer;
import frc.robot.Constants;

public class DriveArcade extends Command {
  public DriveArcade() {
    // Use addRequirements() here to declare subsystem dependencies.
    addRequirements(RobotContainer.m_drivetrain);
  }

  // Called just before this Command runs the first time
  @Override
  protected void initialize() {
  }

  // Called repeatedly when this Command is scheduled to run
  @Override
  protected void execute() {
    double moveSpeed = -RobotContainer.driverController.getRawAxis(Constants.DRIVER_CONTROLLER_MOVE_AXIS);
    double rotateSpeed = RobotContainer.driverController.getRawAxis(Constants.DRIVER_CONTROLLER_ROTATE_AXIS);

    RobotContainer.m_drivetrain.arcadeDrive(moveSpeed, rotateSpeed);
  }

  // Called once the command ends or is interrupted.
  @Override
  protected void end(boolean interrupted) {
    Robot.m_drivetrain.arcadeDrive(0, 0);
  }

  // Make this return true when this Command no longer needs to run execute()
  @Override
  protected boolean isFinished() {
    return false;
  }
}
Using setDefaultCommand#
- Commands passed to this method will run when the robot is enabled.
- They also run if no other commands using the subsystem are running.
- This is why we write addRequirements(Robot.m_subsystemName) in the commands we create, it ends currently running commands using that subsystem to allow a new command is run.
1) Back in RobotContainer.java in the constructor we will call the setDefaultCommand of m_drivetrain and pass it the DriveArcade command
In the RobotContainer.java constructor type:
m_drivetrain.setDefaultCommand(new DriveArcade());Tip
Remember to use the light bulb for importing if needed!
Example
Your full RobotContainer.java should look like this:
package frc.robot;

import edu.wpi.first.wpilibj.Joystick;
import frc.robot.commands.*;
import frc.robot.subsystems.*;
import edu.wpi.first.wpilibj2.command.Command;

/**
 * This class is where the bulk of the robot should be declared.  Since Command-based is a
 * "declarative" paradigm, very little robot logic should actually be handled in the {@link Robot}
 * periodic methods (other than the scheduler calls).  Instead, the structure of the robot
 * (including subsystems, commands, and button mappings) should be declared here.
 */
public class RobotContainer {
  // The robot's subsystems and commands are defined here...
  public static final Drivetrain m_drivetrain = new Drivetrain();
  private final ExampleSubsystem m_exampleSubsystem = new ExampleSubsystem();

  private final ExampleCommand m_autoCommand = new ExampleCommand(m_exampleSubsystem);

  public Joystick driverController = new Joystick(Constants.DRIVER_CONTROLLER);

  /**
   * The container for the robot.  Contains subsystems, OI devices, and commands.
   */
  public RobotContainer() {
    // Configure the button bindings
    configureButtonBindings();

    // Set default commands on subsystems
    m_drivetrain.setDefaultCommand(new DriveArcade());
  }

  /**
   * Use this method to define your button->command mappings.  Buttons can be created by
   * instantiating a {@link GenericHID} or one of its subclasses ({@link
   * edu.wpi.first.wpilibj.Joystick} or {@link XboxController}), and then passing it to a
   * {@link edu.wpi.first.wpilibj2.command.button.JoystickButton}.
   */
  private void configureButtonBindings() {
  }


  /**
   * Use this to pass the autonomous command to the main {@link Robot} class.
   *
   * @return the command to run in autonomous
   */
  public Command getAutonomousCommand() {
    // An ExampleCommand will run in autonomous
    return m_autoCommand;
  }
}