Creating Project Files#
Lets get started


Overview#
Before we can start programing a robot, we must create a new project in Visual Studio Code (VSCode).
See table of contents for a breakdown of this section.
Creating a New Project#
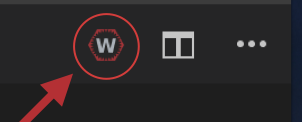
1) Select the W icon from the tab bar or use the shortcut by holding down Ctrl+Shift+P at the same time. (Replace ctrl with command on macOS)
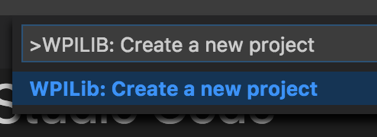
2) Type and hit enter or select WPILib: Create a new project
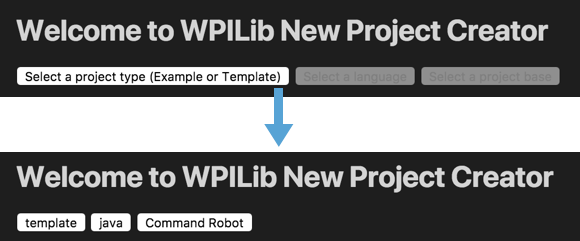
3) Click Select a Project Type and choose Template
4) Click Select a Language and choose Java
5) Click Select a project base and choose Command Robot
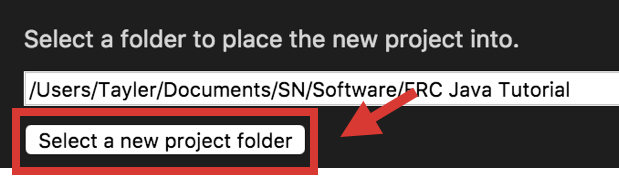
6) Click Select a new project folder and choose where on your computer you would like to store the program
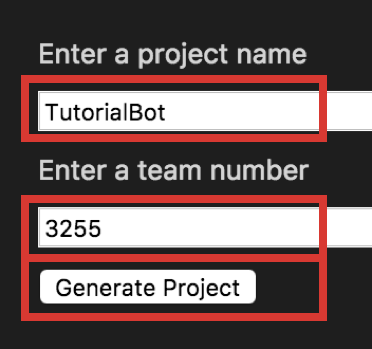
7) Enter a project name in the text field labeled as such
8) Enter your team number in the text field labeled as such
9) Select Generate Project
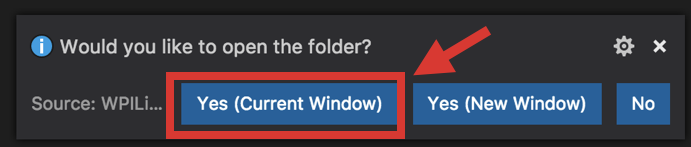
10) When prompted “Would you like to open the folder?”, select Yes (Current Window)
Default Project Contents#
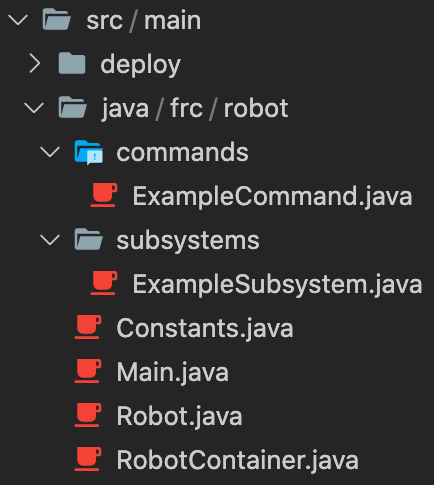
Newly created projects have many files within them. We only care about the contents within the src/main/java/frc/robot/ folder. Everything else can be ignored at this point in the tutorial.
Files in the robot folder:
- ExampleCommand.java
- An example Command
- ExampleSubsystem.java
- An example SubSystem
- Constants.java (new in 2020, replaces RobotMap.java)
- Used to map physical ports (digital if using the CAN bus) of sensors or devices connected to the robot and assign them a variable name to be used in other parts of the code.
- This provides flexibility for changing wiring, makes checking the wiring easier, and significantly reduces the number of magic numbers floating around.
- Can also be used to store generic constant values as variables in the code
- Used to map physical ports (digital if using the CAN bus) of sensors or devices connected to the robot and assign them a variable name to be used in other parts of the code.
- Main.java
- Used for advanced programming
- Will be ignored/left as is for this tutorial
- RobotContainer.java (new in 2020, replaces OI.java)
- Used to declare our subsystem
- Used to create a connection between commands and Operator Interfaces (OI) such as Joysticks or buttons
- Robot.java
- The main class of the robot which is run when a robot boots up.
- Used to run special methods in the init and period phases of the auto, teleop, and disabled states
Example
Creating a New Subsystem#
1) Click on the src folder to expand it.
2) Do the same for java then subsystems
3) Right click on subsystems and select Create a new class/ command.
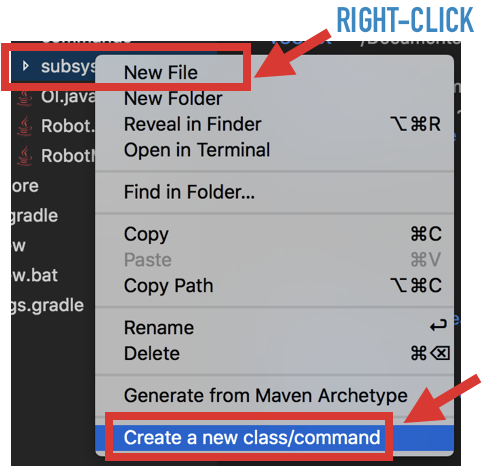
4) Select Subsystem (New) and type your DesiredSubsystemName (i.e. Drivetrain) for the name and hit enter on your keyboard.


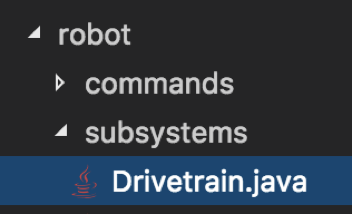
5) Click on the newly created DesiredSubsystemName.java (or Drivetrain.java if you named it that)
Adding the Subsystem to RobotContainer.java#
Do not forget this step!
When a robot program runs on the roboRIO it only runs the main file Robot.java and anything Robot.java links to such as RobotContainer.java.
We have created a new subsystem but we have not yet linked it to Robot.java through RobotContainer.java.
We must do this for EVERY subsystem we create
1) In RobotContainer.java we will create a new public global constant variable of type DesiredSubsystemName (i.e. Drivetrain):
public static final m_desiredSubsystemName = new DesiredSubsystemName();
(i.e. public static final m_drivetrain = new Drivetrain();)

Now when we use this subsystem in commands, we must call RobotContainer.m_desiredSubsystemName. to get access to it and its methods. (i.e. RobotContainer.m_drivetrain.someMethod())
Default Subsystem Contents#
Newly created subsystems are empty with the exception of the periodic.
- Currently there is no constructor, we will create a constructor ourselves later.
- periodic - a method that will be called periodically (once per robot scheduler run)
- Useful for adding/updating data to Driverstation dashboard
- Useful updating variables that need to always up to date
Example
package frc.robot.subsystems;

import edu.wpi.first.wpilibj2.command.SubsystemBase;

public class Drivetrain extends SubsystemBase {
  /**
   * Creates a new Drivetrain.
   */
  public Drivetrain() {

  }

  @Override
  public void periodic() {
    // This method will be called once per scheduler run
  }
}
Creating a New Command#
1) Click on the src folder to expand it (if it isn't already).
2) Do the same for commands

3) Right click on commands and select Create a new class/ command.
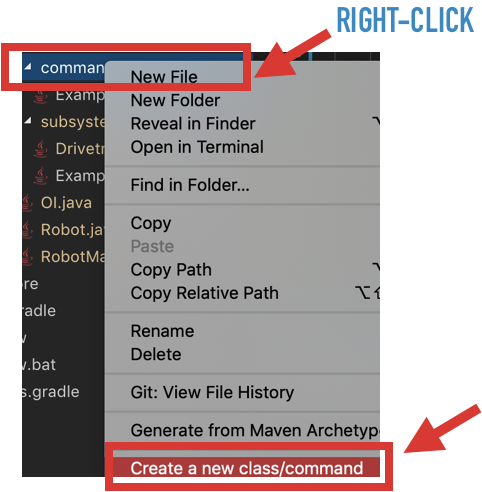
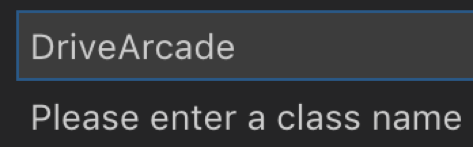
4) Select Command (New) and type DesiredCommandName (i.e. DriveArcade) for the name and hit enter on your keyboard.

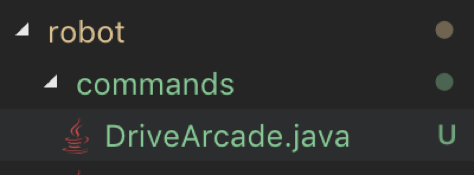
5) Click on the newly created DesiredCommandName.java (or DriveArcade.java if you named it that)
Default Command Contents#
Newly created commands have some predefined methods in them specific for a command based robot.
- Constructor - Called when the robot program is FIRST loaded.
- Subsystem dependencies are declared here.
- initialize() - Called ONCE just before this Command runs the first time.
- execute() - Called REPEATEDLY when this Command is scheduled to run
- end() - Called ONCE after isFinished returns true or when another command which requires one or more of the same subsystems is scheduled to run
- isFinished() - Make this return TRUE when this Command no longer needs to run
execute()(initialize always runs once regardless).
Example
package frc.robot.commands;

import edu.wpi.first.wpilibj2.command.CommandBase;

public class DriveArcade extends CommandBase {
  /**
   * Creates a new DriveArcade.
   */
  public DriveArcade() {
    // Use addRequirements() here to declare subsystem dependencies.
  }

  // Called when the command is initially scheduled.
  @Override
  public void initialize() {
  }

  // Called every time the scheduler runs while the command is scheduled.
  @Override
  public void execute() {
  }

  // Called once the command ends or is interrupted.
  @Override
  public void end(boolean interrupted) {
  }

  // Returns true when the command should end.
  @Override
  public boolean isFinished() {
    return false;
  }
}